Monday, November 30, 2009

Light- emitting diodes

Our current assignment at the Fab Academy involves learning to program microcontrollers. I'm going to to make strips of LEDs to attach to my bike wheels. When rotating, the strips will create patterns in light, and make me much more visible when biking at night.

Light- emitting diodes can be very simple to use, but I played with a few different (unnecessary) things above to learn more about them.

Here I learned to program how long each light is on, and how long the pauses last between each illumination. I tried to write a pattern of lighting that emulated the syncopation of a heartbeat.
Whoa!

Saturday, November 28, 2009

For Yana


I made a rufflebeard for Yana, who came to the States from Russia on a Fulbright Scholarship for photography. She'll be going back soon, and I imagine winters to be colder in Moscow than in Providence.

She stealthily stole this image when she told me to read a poster behind me on the train.

Thursday, November 26, 2009

Thoughts on Chloe's Dissertation

Art & craft are not so different. There are many more commonalities between them than there are differences between the two. The contexts in which "art" and "craft" are presented are really what distinguish them, rather than the content or purpose of the works themselves. Variables in presentation affect how pieces are perceived by different audiences.

I think many people have negative associations with the term "craft," like simple children's projects that involve dry macaroni and construction paper. (I am not assigning value but referencing a commonly held perception.) The term "art" is held up at nearly inaccessible lengths by many, as if to express the thought, "I could never do that!" This sentiment simply agrees with the elevated presentation of anything on a pedestal, ("It must be of a higher value,") as opposed to seeing all things as possible, ("You could do that!") and understanding all living beings to be inherently creative. (Like procreation!)

Practicing traditional crafts together is a way of creating community; preserving traditions; connecting to our surroundings; slowing down this rushed pace of life; being frugal, self-sufficient, and even revolutionary; having fun, and literally building the worlds in which we want to live.

Wednesday, November 25, 2009

Shelves from the Shopbot


Asher Dunn shows me and Shawn Wallace a cherry wood glassblowing mold that was made on the Shopbot at Keeseh Studios. Photo by Elliot Clapp.

I designed some shelves and cut them out on a Shopbot!
While working, all pieces have to be secured to the bed of the machine (or to each other) because the tool is so powerful that the router could send a loose piece flying and seriously hurt someone.

I screwed my 4' x 8' sheet of MDO (medium density overlaid plywood) to the bed of the machine, and we programmed it to cut tabs between some of the parts so they would remain attached to each other. The finished sheet resembled a plastic toy whose tabbed pieces would be broken apart and snap assembled.

Here are some of the shelves after being cut on the Shopbot, and broken apart with a jigsaw.

Thanks to the Avineris for letting me borrow a palm sander. I used it to sand the tabs off the shelf edges. Pictured above are some shelves of the smallest size.

I primed, painted, and installed the shelves in a corner. The largest piece is 45" wide.

I have more shelf pieces cut, but I haven't yet decided where to install them.
Photos of my pieces on the Shopbot at Keeseh Studios will be posted after the holiday.

Monday, November 23, 2009

Not just talk


I did a lot of work today, but I don't yet have photographs of the entire process. Instead, here's a picture of what I look like when I'm thrilled.
Photo by Meg Powers

Sunday, November 22, 2009

Repurpose


My roommate didn't want this computer cable anymore. I made it into a necklace because I thought the form was so interesting! I flameworked all of the glass pieces suspended from it, and I sewed the calyces from felt.

Saturday, November 21, 2009

Handmade Nation and Craftland


The Handmade Nation DVD has been released and it's available from Buy Olmpia and from Amazon. I'm in this book and movie!


I just brought my stock over to Craftland, so you can find my work there from December 4-31 this year. Also, I do custom work at no extra cost so you can email me if you want anything!
JenineBressner@gmail.com

Friday, November 20, 2009

THANK YOU, RISCA!

Thank you so much for this!

My attendance at the Fab Academy is made possible by a grant from the Rhode Island State Council on the Arts, through an appropriation by the Rhode Island General Assembly and a grant from the National Endowment for the Arts!!!

Thursday, November 19, 2009

The Mayor Gave Me A Citation

That's a good thing.

It's because I was one of five people selected to have our work printed on a button for Providence's "I BUY ART" campaign. My name is spelled right, and there's only one little typo on the certificate.

This is my graphic that they used! The buttons are 1.5" inches square. There are somewhere between 600-1000 of these now floating around. I'm not certain how many there are, but you can pick them up for free all over town!

Wednesday, November 18, 2009

How To: Hot- fix/ Heat- set


When I photographed my ruffle beard I realized that my hoodie also had a lot of handwork on it. Sita asked me how this iron- on stuff works. Hot- fix or heat- set studs are mostly inexpensive and easy to use.

I arranged these to look like knit stitches or reptile skin. This is the same type of stuff that's used on commercially produced garments that say, "Princess," in rhinestones.

I buy my pieces wholesale from a local supplier. The shapes are thin, concave pieces of metal. The backs are pre- coated with a thin layer of solidified hot glue. Using these is as simple as setting them down on a flat fiber surface (shiny side up) and gently applying a hot, dry iron to them. They should be heated for a few seconds- enough to allow the adhesive to melt, and for the glue to flow and bond to the fibers of the fabric. When creating a larger design or letters, I carefully apply studs and heat a small section at a time. I focus on using the tip of the iron where there are no steam vents. If the iron is applied at an angle (like a plane landing) it is likely that the arranged pattern of studs will get distorted. I had the best results when applying the iron straight down onto the fabric, perpendicular to the surface.

Here I attached studs over the ropes of the leafcutter ants on this Beehive Collective patch. Because these were applied to a slippery surface, the glue did not adhere well initially. I removed all of the metal pieces, and sewed a running stitch along the ropes to create a tooth in the surface of the satin fabric. The studs have been stuck on for several years now.

It took me two days to lay out and iron on these stones. The smallest ones are called naiheads; they're 2 millimeters in diameter. The largest ones are cone spikes, not hot- fix studs but spikes with prongs coming off the back to set them in. If you click twice on these images they'll get really large.

Tuesday, November 17, 2009

Lasercut pieces


This is a sheet of lasercut pieces for the jointed figures. This material is matboard from a frame shop.

This is a press- fit swingset that I lasercut from 1/4" thick wood.

I drew these shapes on a computer with a mouse, which took a very long time and hurt my wrist. I am investing in a tablet so I can draw more comfortably on the computer.

Monday, November 16, 2009

Anticipating

It's getting to be that time of year again, when the holiday sales are approaching;

Time to dye my hair.

Sunday, November 15, 2009

Torchwork


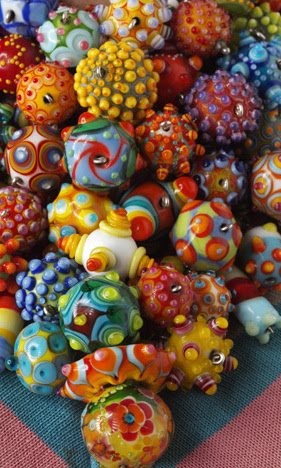
I think this is the biggest bead I've yet made. Though hollow inside, it's still pretty heavy. I made it, coreformed, on a Hothead torch a few years ago.

Colors in glass are determined by metals suspended within the glass. Gold pink is the most expensive soft glass color I can think of because there is real gold in the glass! It is one of my favorite glass colors, vibrant and lovely, though unpredictable because the dispersion of gold is often inconsistent throughout each glass rod.

I like eating sushi and I like making it in glass. I posted this earlier- - this sushi plate is less than one inch long.

My favorite sushi to make in glass is ikura (salmon roe) because the real stuff is inherently glassy. I'm building my stocks for holiday sales!

Saturday, November 14, 2009

Textile jewelry


Who isn't struck by the visage of a coil necklace on someone from the Padaung tribe of Burma or the Ndbele tribe of South Africa? I made this necklace of fleece and spandex in 2002. It was photographed in a fashion shoot for the November 2003 issue of Venuszine.

This bracelet has a lot going on. I made experimental forms in several different fabrics, and attached them to to an elastic ribbon, along with some flameworked glass.

As a child I was very impressed with corsages. I thought they were so beautiful!

I think of this as a corsage for every day.

I made these textile earrings around the same time as the yellow rufflebeard pictured at top. The nylon mesh is much softer than tulle.

I found some Walkman speakers that someone threw away. They worked fine! I taped them together, sewed a silk cover, and embroidered the surface of the speakers to look like a cassette tape.

I embroidered this silk surface with sewing thread, rather than embroidery floss.

Friday, November 13, 2009

Soldering

I milled this circuit board, tinned the pads, and soldered some components to it. We used a Modela and tiny bits (1/32" and 1/64") to mill it out. The board is a phenolic paper laminate with a thin layer of copper foil on top. I was advised to apply hot glue to the leads to reinforce the solder, because the copper foil might peel off the phenolic paper substrate. Unfortunately, while I was applying the glue the traces ripped off the board. I'll be milling and stuffing another board on Monday.

I already had some soldering experience.

I made this bracelet from sheet sterling silver. I cut and forged everything and set the double bezels for the blue onyx stones. I've been wearing it pretty consistently since I made it when I was 16.

I also had some experience with soldering stained glass.

This is part of a stained glass Q*Bert screen I soldered and displayed in an old plastic television housing. I have to reattach the rest of it.

Thursday, November 12, 2009

Sita's Mala


While playing I realized another possible configuration for the many arms of my lasercut jointed figures.

They now present:

Sita's Mala! I flameworked way more than 108 glass beads to make this bracelet. Tomorrow it begins its journey to its new home in Honolulu!

Tuesday, November 10, 2009

Clouds and trees


I like flameworking these forms in glass. I call them "bubbleclouds."

This shape makes me think of hops and asparagus. Adding stamens or pistils will make lots of forms more elegant or interesting.

I flameworked this tree from broken beer bottles. The cord from which it is suspended is made from a plastic bag that I twined. The cord is only one millimeter in diameter!

Here's is another glass tree that I lampworked. It was definitely inspired by some childhood toys.

Here's a photo of some of my book/ zine shelves. I love how the spines are so many stripes of color.